|
Calibrate Your Speed Controls
by David Dellenbaugh
Remember how fast you were
going upwind at the end of your last regatta? You
felt like the boat was finally in the groove, and
you actually had a pointing and speed edge on your
competition!
Unfortunately, that was almost a month ago. Now,
as you prepare your boat for the next big race,
you cant remember how the rig was set up. You
have no idea how much pre-bend or rig tension you
carried. And your new jib trimmer wants to know
what halyard tension and lead position worked best
before.
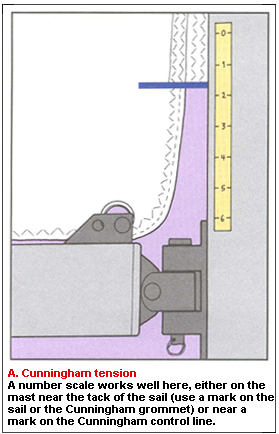 |
A. Cunningham tension
A number scale works well here, either on the
mast near the tack of the sail (use a mark on
the sail or the Cunningham grommet) or near a
mark on the Cunningham control line. |
One of the keys for success in sailing is the
ability to reproduce the way your boat was set up
when you were going fast. This is especially true
for upwind performance, where small adjustments
can make huge differences.
Its not too hard to get your boat going fast
occasionally. This may be a matter of luck, but
sooner or later almost everyone gets their boat
set up exactly right for the conditions, even if
its just for a few moments. Thats a great
feeling!
However, if you want to be fast consistently over
time, you need more than good fortune. You need a
systematic approach to tuning and trimming all
your speed-related variables. This is where
calibrating, coding and measuring is important.
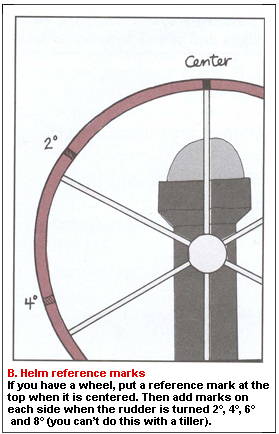 |
B. Helm reference marks
If you have a wheel, put a reference mark at
the top when it is centered. Then add marks on
each side when the rudder is turned 2°, 4°, 6°
and 8° (you cant do this with a tiller). |
The key to good performance is simple: Identify
how your boat is set up when its going fast, and
be able to reproduce this the next time you have
similar conditions. This wont always work, but it
will get you in the right ballpark, and it will
get you there quickly so you dont waste a lot of
time (and speed) re-learning what you knew before.
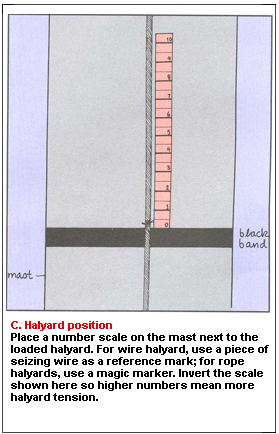 |
C. Halyard
position
Place a number scale on the mast next to the
loaded halyard. For wire halyard, use a piece
of seizing wire as a reference mark; for rope
halyards, use a magic marker. Invert the scale
shown here so higher numbers mean more halyard
tension. |
Tips about calibrating
When you use number scales for measuring, orient
these so the higher numbers mean that the control
is being pulled tighter.
Position all reference marks and scales so that
you can see them, if possible, from your normal
sailing positions. You may want to place two sets
of numbers near some controls - one for each tack.
Look for sweet spots or happy moments when
the boat is dialed in (i.e. it feels great and
your performance is better than nearby boats).
Note the settings for key variables at these
times.
Unless you have an extremely good memory, record
fast settings in a notebook after each regatta or
day of sailing. List the conditions (wind and
waves) and any specific settings that seemed to be
fast.
For clarity, use numbers or colors when you ask
team members to make adjustments. For example,
its not so clear what you mean if you say, Give
me more outhaul. Its much clearer to say,
Tighten the outhaul to #5. or Pull the vang to
Red.
Your reference marks may not be 100% reliable or
comparable over time since tuning variables can
change. For example, shrouds, halyards and
steering cables may stretch. So either
re-calibrate these after a while, or use your
marks to help you measure how much they are
changing.
 |
D. Headsail
trim marks
Put clear marks on your lower spreaders at
regular intervals from the end. Use these to
reproduce jib lead position and jib sheet trim
on each tack, and to compare setting on both
tacks. |
Measure theses 15 speed-producing variables
One of the keys to good upwind speed and pointing
is being able to get all the right rig and sail
settings consistently. To do this, you need
calibration scales on all your main speed-related
controls so you can reproduce fast trim.
Cunningham
Use a number scale for measuring the luff tension
in your mainsail (see A below).
Outhaul
Put a number scale on the end of the boom near the
mainsail clew to measure the fullness in the lower
part of your main.
Vang tension
Use colored marks on different parts of the vang
for reference. Then you can say, Take the vang to
yellow!
 |
E. Mast
position at partners
Put a reference mark on the mast and one on
the deck where the mast is at its neutral
(middle of its range) position. You could also
use a number scale here, or just count the
number of blocks that you put in front of or
behind the mast. |
Mast butt position
Calibrate the fore-and-aft position of the mast
step using a system that works with your mast.
Mast partner position
See E (below) for several ways to identify exactly
where the mast is at deck level.
Jib/Genoa halyard
Measure halyard tension with a number scale on the
mast and a reference mark on the halyard (see C).
Rig tension
Use a tension gauge on the shrouds, or measure how
much jack pressure you use to pump up the rig.
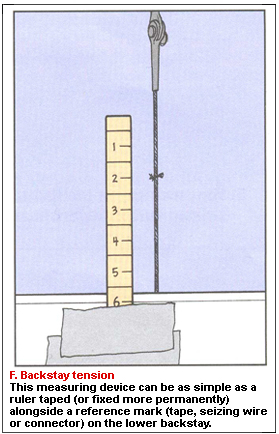 |
F. Backstay
tension
This measuring device can be as simple as a
ruler taped (or fixed more permanently)
alongside a reference mark (tape, seizing wire
or connector) on the lower backstay. |
Backstay tension
Use a number scale and a reference mark on the
backstay to gauge tension (see F).
Jib lead position
Use a numbering system to identify both the
fore-and-aft and the athwartships position of the
jib car.
Jib trim angle
Put calibrated marks (numbers or colors) near the
spreader tips to see relative position of the jib
leech (see D).
Rudder angle
Put marks on your wheel (see B) that correspond to
different rudder angles so you know how much helm
you have.
Fore-and-aft boat trim
Place an inclinometer along the fore-and-aft axis
of the boat to measure weight placement.
Angle of heel
At the forward end of the cockpit, put an
inclinometer perpendicular to the boats
centerline to measure heel angle
Mainsail and jib sheets
Put marks on each sheet in a place thats easy to
see; use these for reference when trimming.
Traveler car position
Use a number scale along the traveler track to
quantify the position of the traveler car on each
tack
Dave publishes the newsletter Speed & Smarts.
For a subscription call: 800-356-2200 or go to:
www.speedandsmarts.com.
TOP/images/top.jpg)
|
